The helical pile installation process is quite different from that of traditional foundational solutions. That said, if you’re considering taking advantage of its benefits for your next project, you may have some questions before getting started.
Below, we’ll discuss everything you need to know about helical pile installation. We’ll talk about what makes it so unique and advantageous and provide a step-by-step guide to the process.
The Benefits of Helical Pile Installation
Due to increasing demand for new construction, building engineers and contractors are starting to look for innovative ways to form foundations. They need a solution that’s durable and capable of withstanding the various environmental conditions in which they’re building, but also one that’s quicker, easier, and will help them streamline their operations. That’s why many are turning to helical piles.
No matter the scope of a project, helical piling offers great benefits — many of which are related to the installation process, like:
- All-weather installation – Not sunny and 75? No problem. Helical piles can be installed no matter what Mother Nature throws your way.
- Remote and limited-access installation – Some industries and applications require facilities to be constructed in unique locations. Helical piles can answer that challenge.
- Quick, clean & safe installation – No soil excavation is required to install helical piles, making the process relatively quick and clean. In fact, a complete helical pile system can be installed in just hours or days.
- Low environmental impact – Helical piles can be removed and repurposed just as quickly as they can be installed — leaving minimal to no environmental footprint.
- Instant load-bearing capacity – No need to wait for concrete to cure or set! Once installed, helical piles can immediately support structures of all shapes and sizes.
How to Install Helical Piles — 7 Basic Steps
With all of those benefits, helical piles probably sound like a rewarding solution, right? Now you’re probably wondering how to get started.
First, your helical pile contractor will design and supply appropriately sized helical piles for your application. They’ll make sure the provided solution will support your application’s needs.
From there, installation can begin! While you’ll normally trust the same contractor to complete your helical pile installation, you may be curious about what steps they’ll take. Below, we’ll provide you with an overview, but do keep in mind that each project has its unique challenges and specifications that need to be addressed.
1. Determine How Many Helical Piles You Need and How Deep They Need to Go
Different projects require different numbers of helical piles. This number heavily depends on the size of your project and the load the helical pile system must support.
Another factor that goes into this step is depth. Here’s the general rule: the deeper the helical pile is driven, the more support it can provide. Therefore, these amount and depth calculations are critical to ensuring a safe, sound, and durable solution.
2. Attach the Helical Pile Lead Section to the Drive Head
Helical piles are installed with the help of other equipment and machinery, which usually includes a helical drive head that’s attached to an excavator. From there, the installation specialist will attach the first helical pile lead section to that drive head, preparing it to be driven into the ground.
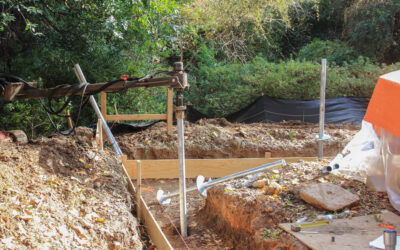
3. Drive the Helical Pile into the Ground
This step sounds basic, but requires a lot of precision. The pilot point of the helical pile must be driven into the ground at the proper location, inclination, and orientation in order to achieve the best results. These specifications are determined ahead of time and written in an installation plan.
4. Rotate the Helical Pile into the Ground
Once the helical pile’s pilot point meets the earth, the pile is smoothly rotated into the ground following a clockwise direction. This process continues at a steady pace, generally at about three inches per revolution.
5. Add Helical Pile Extension Sections as Necessary
Helical piling sections are only so long. Therefore, adding extension sections is often necessary. The number of extension sections needed depends on how deep your helical piling system needs to be.
6. Check Inclination, Orientation & Alignment Periodically
Throughout the process, the inclination, orientation, and alignment of helical piles should be checked regularly. This is to ensure everything is installed precisely according to the installation plan.
7. Repeat the Process with All Other Needed Helical Piles
Once one helical pile is installed, it’s on to the next one! Steps 2-6 will be repeated in order to install each new pile properly – eventually resulting in a full helical pile system that’s ready to support the large load of your facility.
If you need helical piles installed as the foundation for your next project, trust the experts at Elite Helical. As your turnkey helical pile contractor, we’re your top source for all steps of the helical piling process — from design aid, to supply, to installation. For more information, contact our team today.